Refurbishing an Old Media Cabinet Into a Modern Media Console (With Built-In Mini Fridge)
That old media cabinet had great bones—but everything else screamed early 2000s. Bulky towers, heavy trim, and a dark, shiny finish made it feel outdated and oversized for our space. I found this treasure on Facebook Marketplace and it was way more affordable than buying a new console, I never refurbished a bigger furniture piece like this, so I was very excited. I decided to completely refurbish it into a long, modern media console that could hold the TV and hide a built-in mini fridge inside the cabinets.
This project involved reshaping, sanding, painting, and even adding a granite top. It took time and patience, but the end result looks custom, luxurious, and completely transformed. If you’re comfortable with power tools and detailed prep work, this is a very rewarding intermediate DIY.
Disclaimer: This post contains affiliate links. I may earn a small commission if you make a purchase, at no extra cost to you.
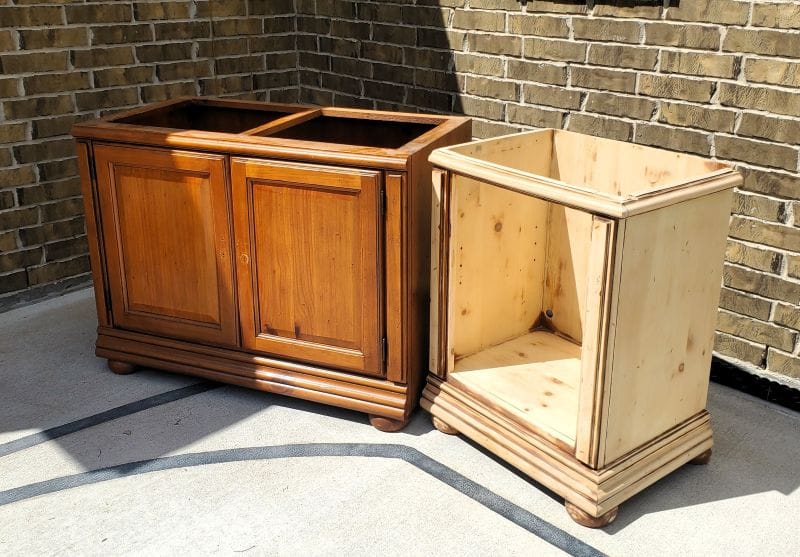
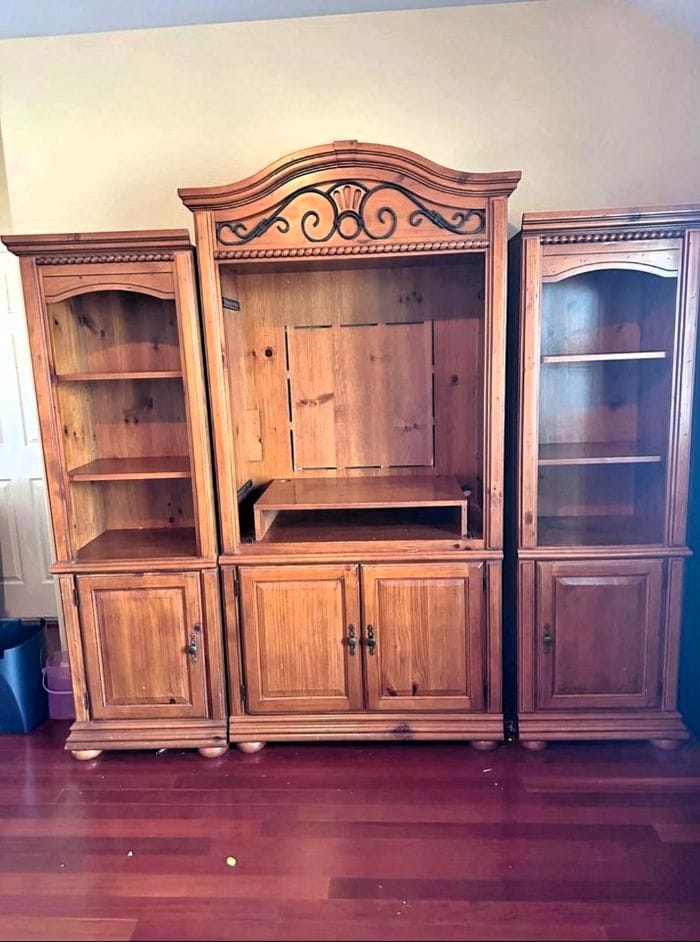 Before – FB Marketplace
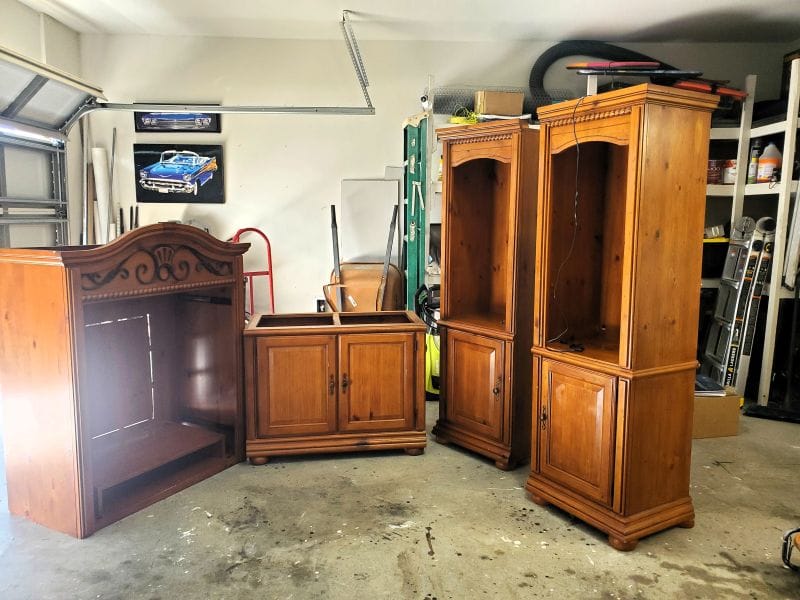 Before – Demolished
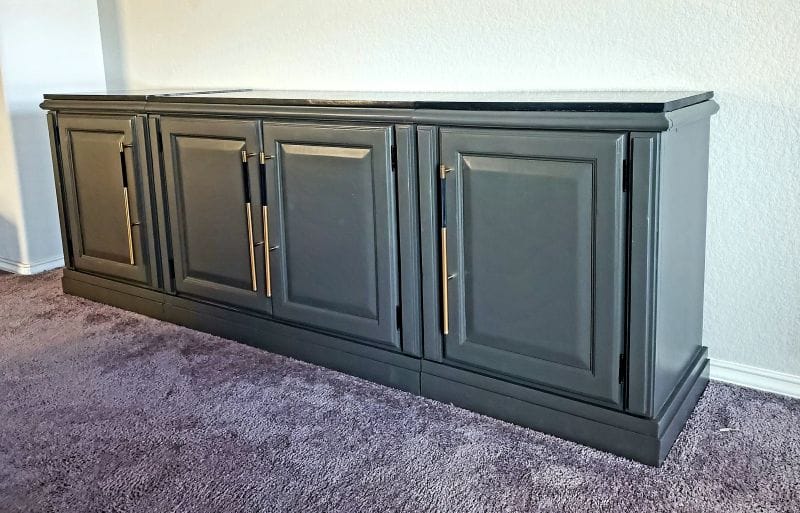
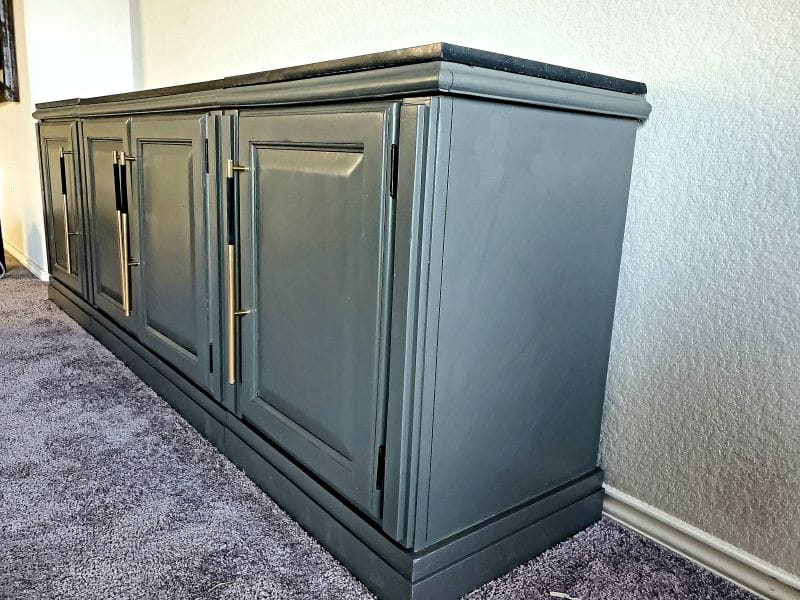 After
After
Project Snapshot / Quick Facts
- Skill Level: Intermediate
- Time Requires: 2-3 Weekends
- Cost: ~$200-$400
Material & Tools List
Materials
- Old Furniture (e.g. Facebook Marketplace)
- Paint (Sherwin-Williams Urban Bronze or similar)
- Paint Stripper
- Sanding Pads
- Granite polishing pads
- Mini-Fridge (This fridge from Amazon was the only fridge with compressor and narrow enough)
- Brad nails
- Wood Glue
- Cabinet Handles (e.g. I love these bronze handles from Amazon)
Tools
- PPE (Hearing Protection, Gloves, Safety Glasses). Get my favorite (Pink) PPE from Amazon
- Measuring Tape (Amazon)
- Drill
- Miter Saw
- Circular Saw
- Sanding block
- Sander: Orbital Sander and Disc Sander (For faster sanding)
- Nail Gun
- Paint Sprayer
Step-by-Step Refurbishing
Step 1: Reshaping the Cabinet & Removing Dated Trim
The original cabinet featured bulky side towers and overly decorative trim that made it feel heavy and outdated. The first goal was to reshape it into a long, low-profile media console—similar in scale to a side table—so it would better suit a modern space and allow the TV to sit directly on top. To achieve this, I completely removed the tall side towers, cut away excess bulk to create a clean rectangular shape, and stripped off all dated trim and decorative details. I also reconfigured the interior to open up enough cabinet space to fit a mini fridge inside. Tip: Plan your final dimensions carefully before cutting, especially if you’re planning to install an appliance inside the cabinet.
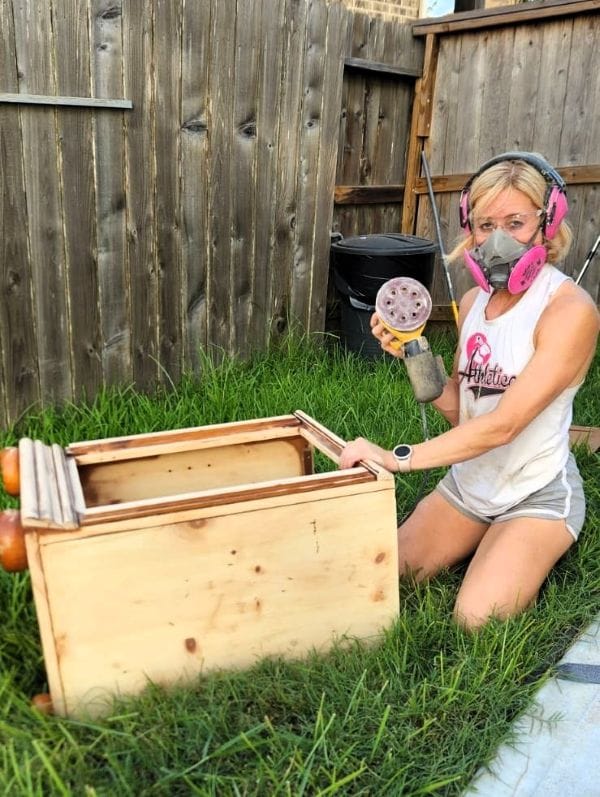
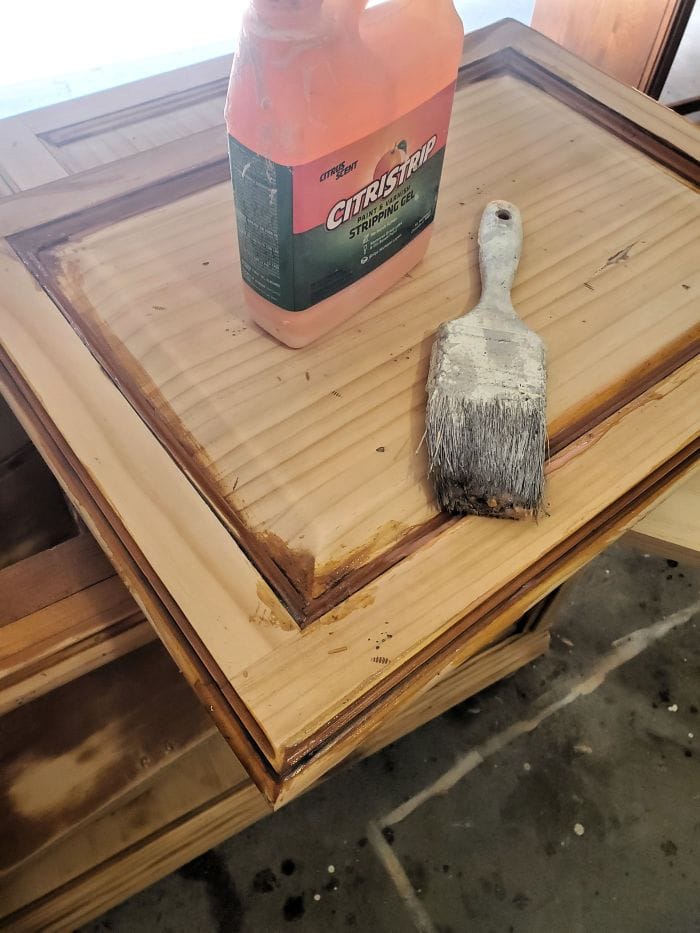
Step 2: Sanding the Entire Cabinet (The Hardest Part)
This cabinet was made of particle board with a thin wood veneer and an extremely thick factory coating. Unfortunately, no chemical stripper worked effectively, which meant sanding was the only real option. Because the veneer layer is very thin, this step required patience and a careful approach. I used a triangle sander to reach the small crevices along the trim as best as possible, then followed up with a citrus-based stripper to help loosen any remaining finish. Since the cabinet would be painted, it didn’t need to be absolutely perfect—just smooth and well-prepped. For the main surfaces, I relied on an orbital sander. While it worked, the process was very time-consuming, and this is where better tools would have made a big difference. Important Lesson Learned:
A disc sander would have dramatically sped up this step. If you’re working with thick factory finishes, I highly recommend using a disc sander over an orbital sander whenever possible.

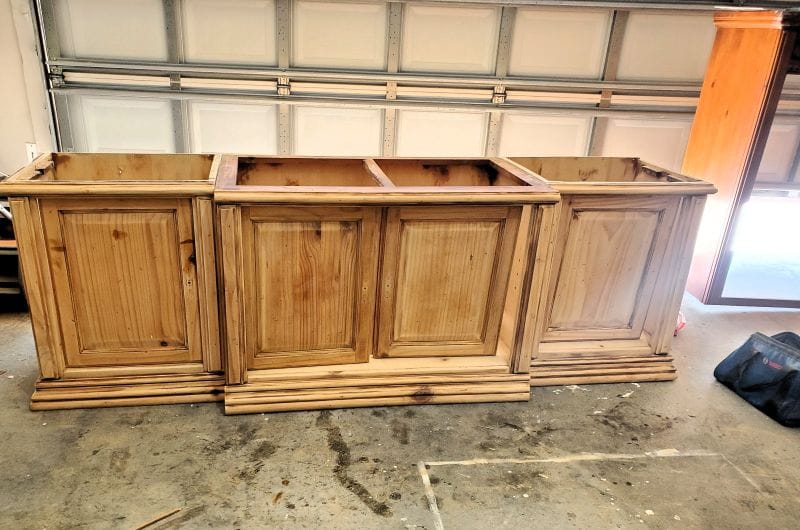
Step 3: Updating the Trim & Modernizing the Base
Once everything was sanded smooth, I focused on modernizing the base of the cabinet. The original bottom trim was bulky and visually heavy, so removing it immediately made the piece feel lighter and more current.
I installed a sleek, modern bottom trim, filled all seams and nail holes with wood filler, and then completed a final round of sanding to create a seamless, polished look. This step alone made a huge visual impact and instantly pushed the cabinet toward a more modern aesthetic.
Step 4: Installing the Granite Top
I still had leftover granite from our kitchen remodel, which made it the perfect material for the top of this media console. While cutting granite sounds intimidating, it’s completely doable with the right blade and a steady hand.
I used a diamond blade with a circular saw to make the cuts. The more challenging—and time-consuming—part was polishing the edges. I used granite polishing pads from Amazon, and while the process took forever, the result was more than good enough for a media console. The edges aren’t perfectly glossy, but they look clean, finished, and professional.
Step 5: Painting the Cabinet in Urban Bronze and Hardware Upgrade for a Luxe Finish
For a high-end, modern finish, I painted the entire cabinet in Urban Bronze. This rich, deep color instantly elevated the piece and gave it a custom, built-in feel. The transformation at this stage was dramatic, even before adding the final details.
To complete the look, I installed modern bronze cabinet handles. This small upgrade made a big difference, tying everything together and giving the console a luxurious, finished appearance.


Step 5: Installing the Mini Fridge (Surprisingly Difficult!)
Finding the right mini fridge turned out to be more challenging than expected, mainly because the cabinet isn’t very deep. Many compact fridges are thermoelectric, which don’t cool as effectively as compressor models. Since I specifically wanted a compressor-style mini fridge, options were limited. After a lot of searching, I found a narrow model from Amazon that fit perfectly—and it works exactly as needed.


The transformation is honestly incredible. What started as a bulky, outdated media cabinet is now a sleek, modern media console that looks intentional and built-in. The granite top, rich bronze finish, and hidden mini fridge make it both functional and high-end.
Q&A, Pro-Tips
Q: Would you do anything differently if you did it again?
A: I would measure all appliances before making final cabinet modifications, and I would absolutely use a disc sander to speed up the sanding process on the main surfaces.
Q: Is it worth refurbishing instead of buying a new console or building one from scratch?
A: In my opinion, absolutely. While you can buy an inexpensive console, it often lacks customization and a solid, high-quality build. Building one from scratch was another option and would have eliminated the sanding process, but it requires more advanced carpentry skills and tools that I didn’t have. Additionally, the cost of lumber and trim can add up quickly, making refurbishing the more practical and cost-effective choice.
Related Projects
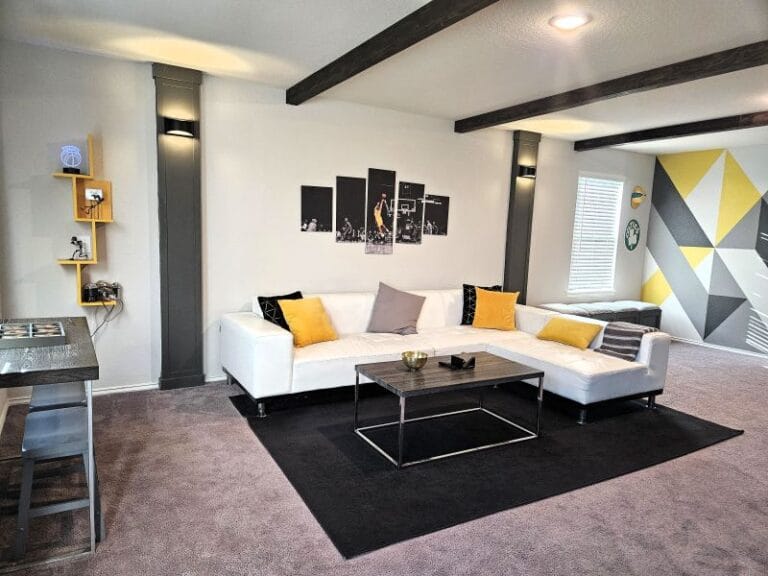
This post is one chapter in a larger transformation—explore the related projects below to see how each part comes together to complete the full vision. Coming Soon:
- Game Room DIY Ceiling Beams on a budget
- Builder-Grade Game Room Transformation: Sporty Wall Makeover Inspiration
- Game Room DIY Window Seating with Popcorn Station (IKEA Hack)
Shop the Look
Create this dramatic Game room setup with the items (or similar) that brought this project to life: Shop my Game Room