How to Build a Mudroom Under the Stairs (Step-by-Step)
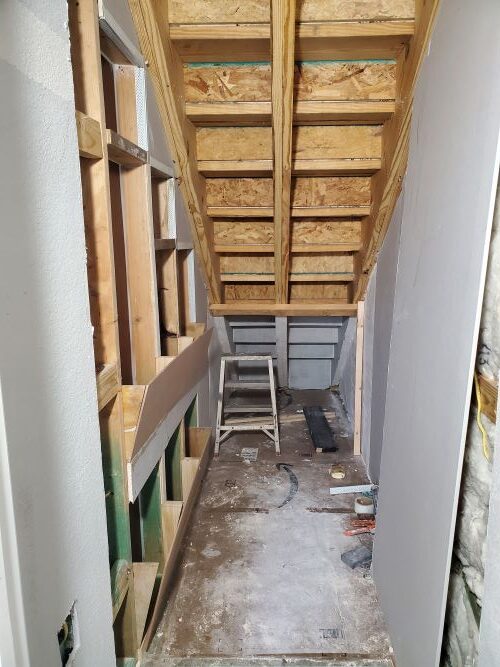
Most homes have at least one corner that feels underused, and for many of us, the space beneath the stairs becomes a forgotten catch-all. In our case, the builder included only a shallow 2-ft-deep closet that left most of the valuable square footage untouched. Instead of letting that awkward void sit empty, we turned it into a fully custom built-in mudroom with cabinets, recessed shelving, and functional seating.
This project can be done in a weekend or two, depending on your experience level, and costs significantly less than hiring a carpenter. Whether you want better organization or simply want to reclaim space, this DIY build delivers both style and practicality.
Disclaimer: This post contains affiliate links. I may earn a small commission if you make a purchase, at no extra cost to you.
Before & After: A Stunning Under-Stairs Mudroom Transformation
From wasted space to a fully customized mudroom with built-in storage!
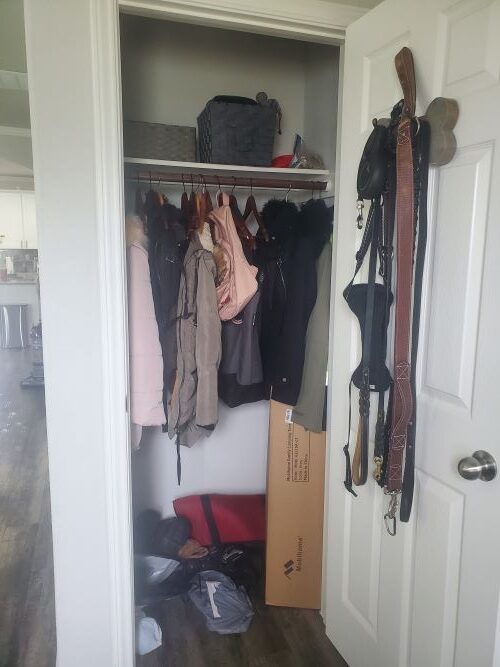 Before
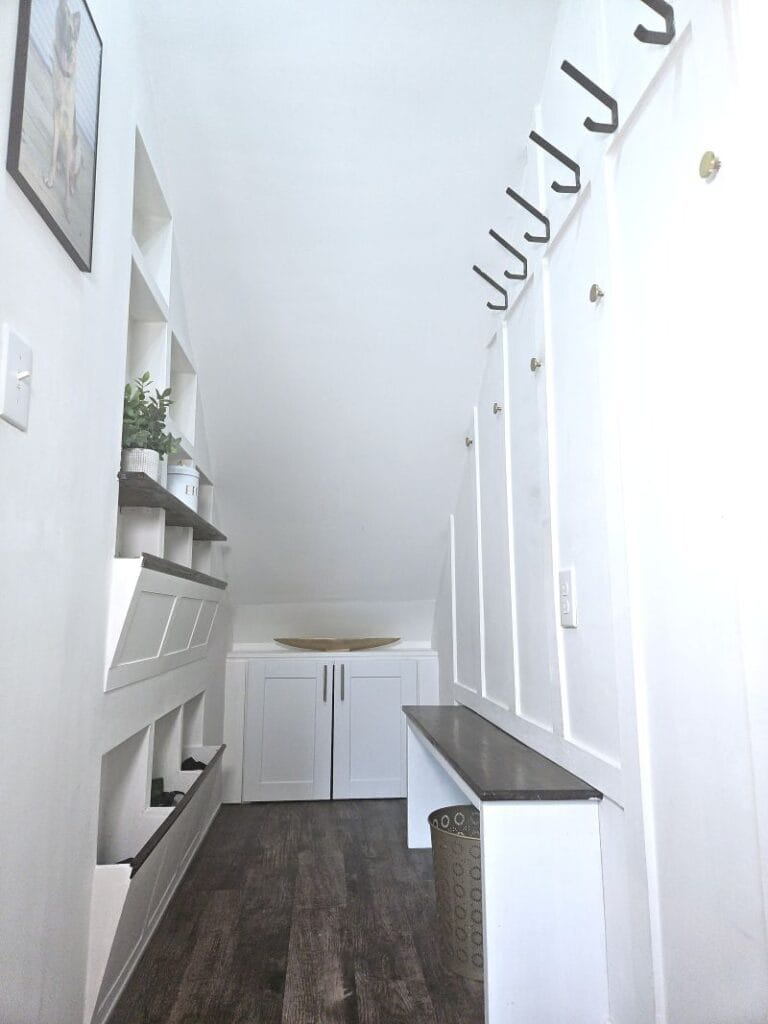 After
After
Project Snapshot / Quick Facts
- Skill Level: Intermediate/ Advanced
- Time Required: 3-4 Weekends
- Cost: ~$200–300 (depending on materials on hand)
Materials & Tools You Absolutely Need for a Flawless Mudroom Build
Materials
- 1/4″ MDF sheets
- Drywall + drywall mud
- Drywall corner beads
- 1/2″ plywood strips (for board and batten wall)
- Pine board for bench top
- Pocket screws
- Repurposed cabinet doors
- Vinyl plank flooring (or peel-and-stick for interior cabinet)
- Primer and paint
- Hooks + hardware
- Wood glue
- Polyurethane
Tools
- Reciprocating saw
- Sledgehammer
- Drill/driver
- Stud finder
- Pocket hole jig
- Measuring tape + level
- Miter saw
- Sanding tools
- Utility knife
- Paint supplies
- Safety Gear (Get my pink PPE from Amazon)
How to Build a Mudroom Under the Stairs (Step-by-Step)
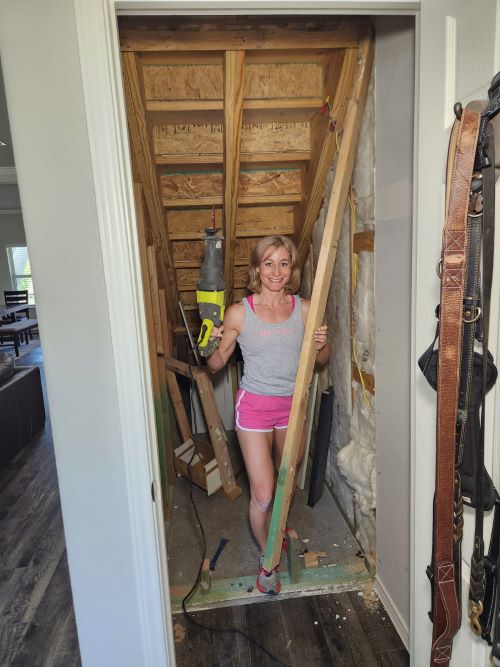
Step 1: Gutting the Old Closet — The Bold Demolition That Unlocked Hidden Space
- Remove the closet door, trim, and any baseboards attached to the original 2-ft-deep closet.
- Attempt to salvage drywall if possible, but remove sections that are over-screwed or damaged.
- Identify all studs in the wall and verify whether any serve a load-bearing role.
- Carefully remove drywall to expose wiring, studs, and the structure behind the closet.
- Disconnect electrical lines running through the wall and cap them so they’re ready for the future light fixture.
- Cut the vertical studs at the bottom with a reciprocating saw to create leverage.
- Bend, twist, or pry studs free from nails holding them to the top plate.
- For the stud anchored directly into the concrete slab:
- Use a sledgehammer to deliver steady, controlled blows
- Work along the grain until the stud loosens from its anchor
- Sweep out debris and confirm there’s now full walk-in access under the stairs.

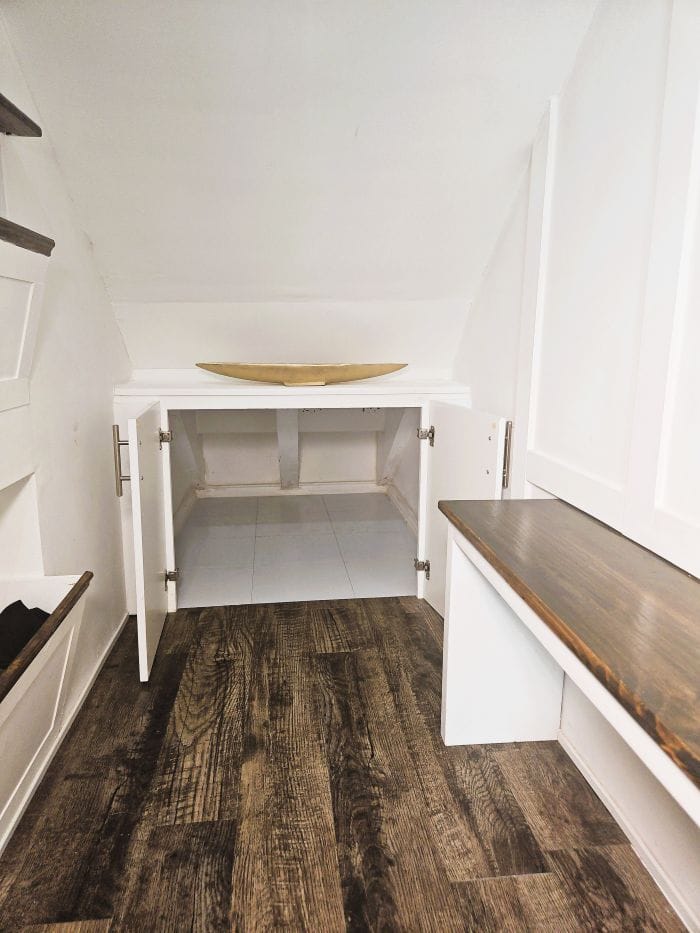
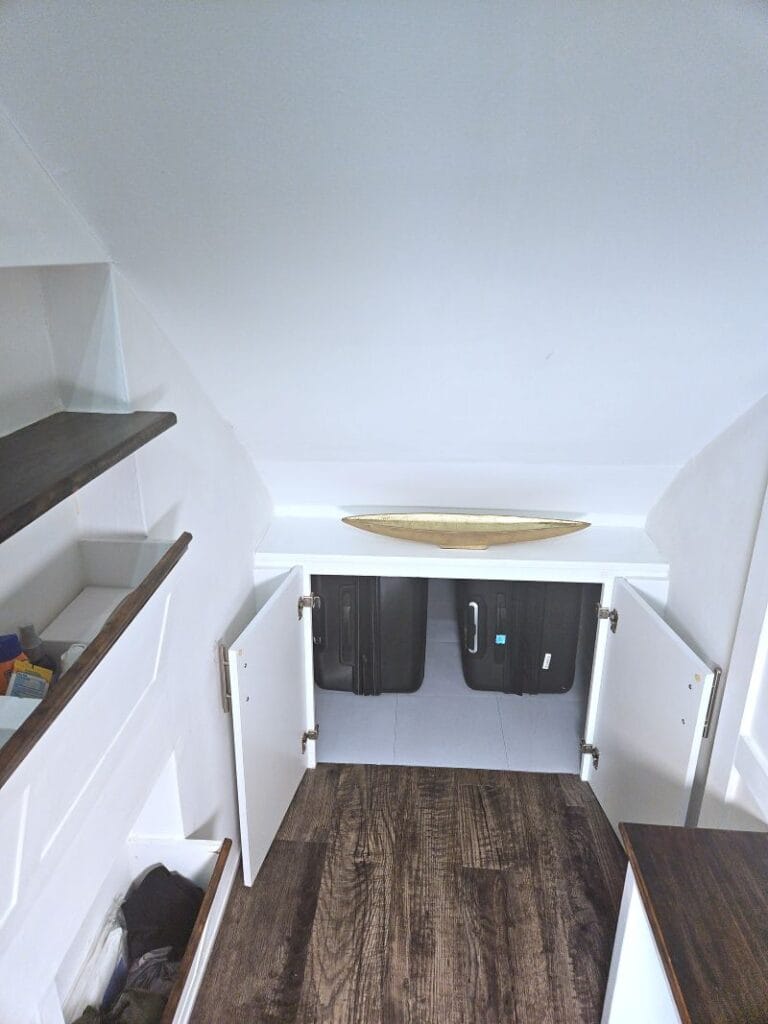
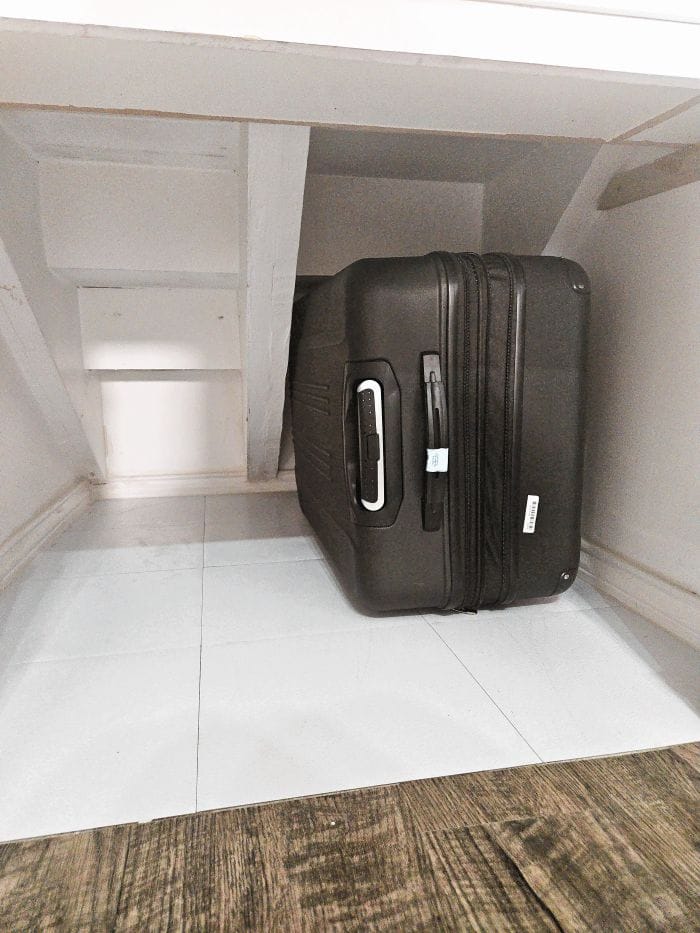
Step 2: Mudroom Cabinet underneath the Stairs
In order to optimize the storage space beneath the stairs, I aimed to utilize every available inch. Recognizing the potential of the stair shape, I decided to leave it intact at the bottom to serve as storage for luggage. To enhance the aesthetics, I installed 1/4″ MDF board to conceal the raw construction wood, giving it a more polished appearance. I attached the MDF with brad nails or screws, ensuring all edges run cleanly into ceiling/wall lines. Then I caulked on seams to create a polished surface ready for paint.


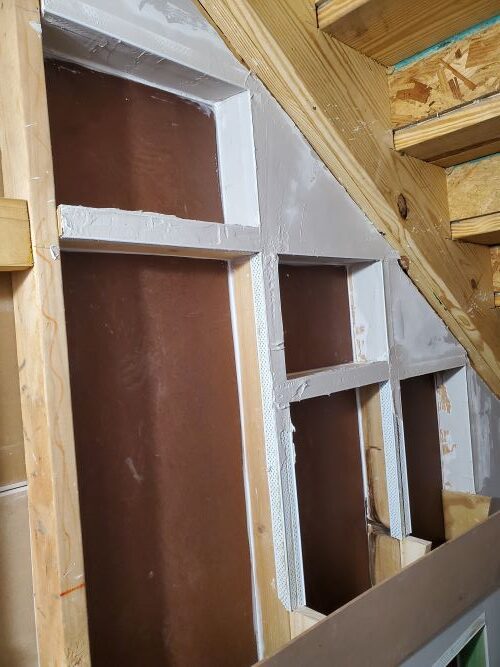
Step 3: Crafting Luxe Recessed Shelves That Disappear Into the Walls
In order to maximize the limited space available, I made the decision to utilize the gap between the studs by installing recessed shelves and storage nooks on one side of the closet. To accomplish this, I repurposed the studs salvaged from the previous demolition, adding additional horizontal studs to create the shelves between the existing ones.
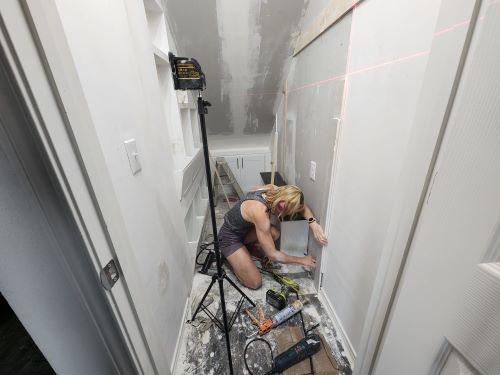
To achieve a sleek and refined look, I incorporated drywall corner beads along all edges and concealed the studs with multiple layers of drywall mud. While it required considerable effort to achieve a smooth finish, the end results were undeniably worth it.
At the bottom of the studs, I created storage nooks by installing 1/4″ MDF board at a slight angle. They are about 4in deep at the bottom and have an opening about 8in. These nooks are ideal for storing frequently accessed items such as umbrellas, gloves, keys, wallets, glasses, helmets, and more. They offer convenient and organized storage within arm’s reach.


Step 4: Adding Cabinet Doors at Bottom of Stairs
Taking advantage of leftover materials from a previous kitchen project, I repurposed two cabinet doors that happened to be an ideal match for the size of the bottom stairs in this current project. To incorporate them seamlessly, I constructed a cabinet front frame using pocket screws, enabling me to securely attach the cabinet doors.
Using pocket screws, I anchored the face plate on both the left and right sides to the wall studs. This method ensured a strong and reliable attachment, guaranteeing that the cabinet doors would function effectively while maintaining a visually appealing appearance.
By reusing these cabinet doors and skillfully constructing the frame, I successfully incorporated a practical storage solution within the available space, blending functionality with a touch of style.

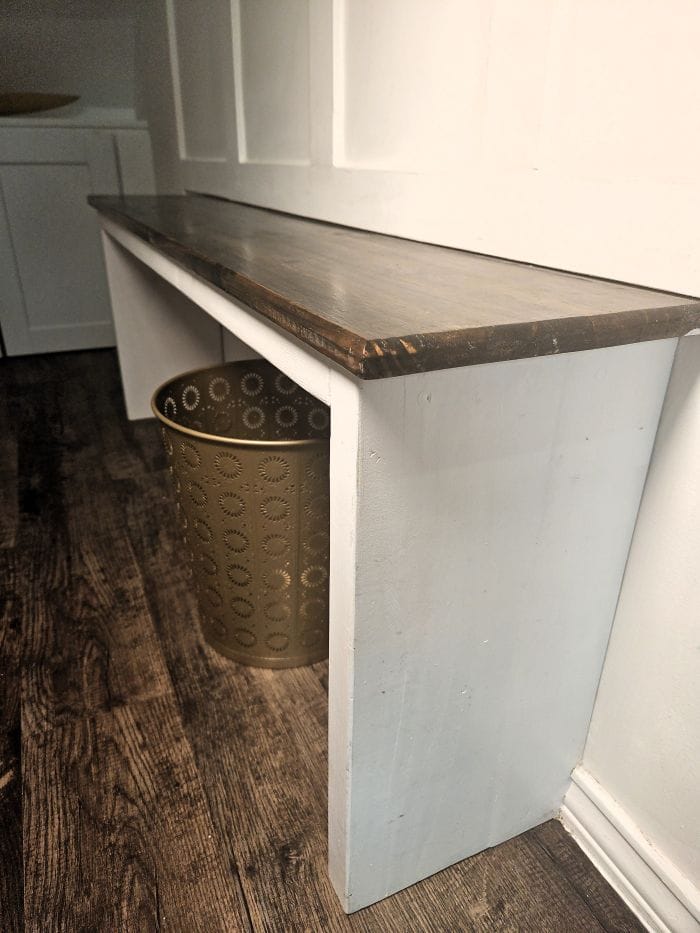
Step 5: How to Build a DIY Mudroom Bench
Utilizing leftover 2×6″ and 2×4″ studs, I ingeniously glued them together to form the sturdy base or legs of the bench. To create the frame, I utilized 2×4″ boards, ensuring it would securely hold both the bench seat and legs. With a combination of screws and glue, I assembled the pieces, ensuring a robust and stable structure.
To complete the bench, I carefully placed a 1/2″ board made of pine wood on top. Prior to installation, I stained the board to achieve the desired aesthetic and protected it with two coats of polyurethane. This not only enhances the visual appeal but also provides durability and resistance to wear and tear.
The finished bench provides a comfortable seating area, perfect for the convenient task of putting on or taking off shoes.


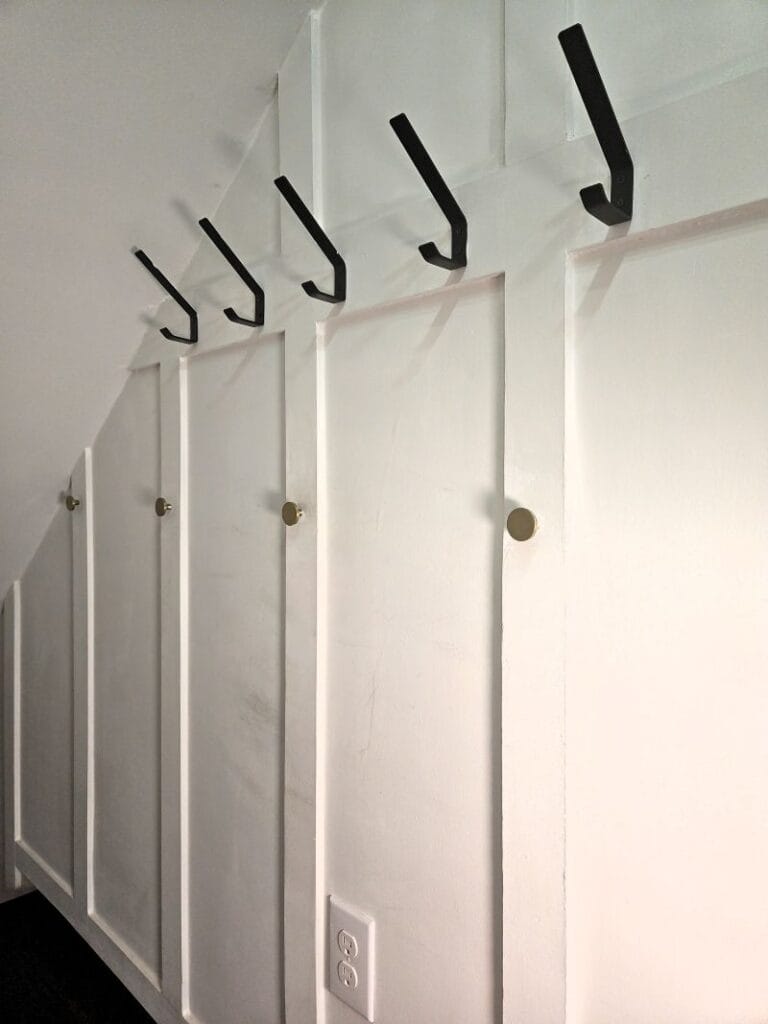
Step 6: Creating a Show-Stopping Board & Batten Accent Wall That Elevates the Entire Space
To enhance the aesthetic appeal of the wardrobe wall, I opted for a board and batten design. The process began by installing drywall as the foundation. Once the drywall was in place, I strategically positioned the board and batten elements to cleverly conceal the seams, ensuring a seamless appearance.
To create the board and batten effect, I utilized a combination of drywall and 1/2″ plywood strips. This combination allowed for a balance of visual appeal and structural stability. Additionally, the use of plywood strips provided extra support when installing hooks or other fixtures, ensuring durability and functionality in the long run.
By carefully implementing the board and batten style, I achieved a stylish and cohesive look for the wardrobe wall, adding character and charm to the overall design.

Step 7: Installing Flooring, Paint and Finishing Touches
After meticulous sanding, multiple rounds of mud application, and additional sanding, the room was finally ready for its transformative coat of primer and paint. With the walls and ceiling flawlessly painted, I proceeded to attach the hooks, cabinet hardware, and decorative wooden trim that I had previously stained, adding the finishing touches.
Fortunately, I had enough vinyl plank flooring remaining to cover the exposed cement, seamlessly tying the space together. However, due to limited quantities, I resorted to using cost-effective self-adhesive vinyl tiles to cover the floor inside the cabinet, ensuring a cohesive and finished look.
In addition, we installed a stylish light fixture above the door on the wall, illuminating the mudroom with a warm and inviting ambiance.
And now, after countless hours of planning, designing, and hard work, the final result emerged—a fully transformed mudroom. It stands as a testament to resourcefulness, attention to detail, and a vision brought to life, ready to serve as a functional and aesthetically pleasing space.


DIY Mudroom Q&A, Pro Tips
Q: Do I need special tools for cutting studs?
A: A reciprocating saw is the easiest and safest way to cut through framing.
Q: How to attach the hooks to the drywall?
A: Use plywood instead of drywall or MDF behind hooks—it holds screws better.
Related Projects
Take a look at how we tackled our small entryway challenge. While this under-stairs mudroom adds much-needed storage and keeps clutter under control, our front door still opens directly into the living room. To help visually define the entry and tie both spaces together seamlessly, we created a DIY grid mirror that adds style, dimension, and a smooth transition between the two areas.