DIY Entryway Grid Mirror Wall (Perfect for Small Hallways)
An entryway mirror isn’t just a practical tool for a last-minute check before leaving the house—it’s also a design trick that instantly makes a space feel larger and brighter. While I still dream of a grand, luxury foyer with double doors and soaring ceilings, our current builder-grade home called for creative solutions. Enter the DIY grid mirror wall—a way to make our compact entryway feel stylish, warm, and functional.
Disclaimer: This post contains affiliate links. I may earn a small commission if you make a purchase, at no extra cost to you.
The Challenge: A Tiny, Builder-Grade Entryway
Our home doesn’t have a traditional entryway. The moment you walk in, you’re already in the living room. Initially, we used an old mirror and console table, but they didn’t match our new furniture or the modern style we were aiming for.
We knew we needed a new mirror—but a standard small mirror would have looked lonely on the wall, and a new table would block the closet door. The solution? A grid mirror wall to visually expand the space and bring in warm wood accents that tie into the living room’s fireplace mantel.
A mirror alone doesn’t solve the storage problem—we needed a place for glasses, keys, and wallets. Instead of relying on a closet, I designed hidden entryway shelves. These shelves are discreet, functional, and add extra character to the space—a perfect DIY addition.
 Before
 After
After
Project Snapshot / Quick Facts
- Skill Level: Beginner
- Time Required: 1 Weekend
- Cost: ~$100–150
Material & Tools List
Materials
- 1×2″ Whitewood boards (ripped in half for a square look)
- 12×12″ mirrors (pack of 4)
- 1/4″ birch plywood
- MDF Panels or similiar (about 4″x24″)
- Wood stain: Dark Walnut and Ebony (Varathane)
- Liquid Nails adhesive/ Glue Gun
- Screws, Brad nails
- Wood Glue
Tools
- Drill
- Nail Gun
- Table Saw
- Miter Saw
- Laser Level
- Measuring Tape
- Clamps
- Sander/ Sandpaper
Step-by Step DIY Entryway transformation
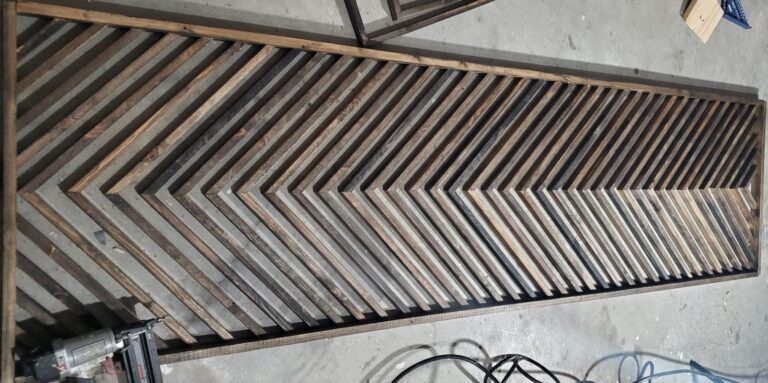
Step 1: Prepare the Wooden Grid
- Rip 1×2″ whitewood boards in half to create nearly square strips. 💡Tip: Pre-made square molding is an option, but ripping your own keeps the project budget-friendly.
- Sand lightly to smooth edges.
- Apply a stain mix of Dark Walnut + Ebony for a rich, warm finish.
- Cut horizontal strips to match the width of your mirrors for a consistent grid layout.
Step 2: Install the Mirrors
- Start with the middle row, attaching the first mirror. Attach the bottom row with sticky tape included in the mirror pack or use the glue gun. This way the mirror adheres to the wall immediately without sliding.
- Install the horizontal wooden strip above each mirror using Brad Nails and Liquid Nails Adhesive/ Glue Gun.
- Continue the pattern, working column by column and row by row. 💡Tip: Keep a laser level handy to ensure all mirrors and strips stay perfectly aligned.
- Finish by adding the outer vertical and horizontal strips on the sides to frame the grid.


Step 3: Add Functional Entryway Shelves
These tiny wooden shelves not only bring in additional wooden accents, but are also very practical. They hide glasses, keys and wallets so the entryway looks always organized. I simply used some painted MDF panels which I screwed into the wall. Then I attached 1/4″ stained plywood which would hide the belongings.


A tiny entryway transformed—now larger, warmer, and functional with hidden storage and a stunning wooden grid mirror wall.
Q&A, Pro Tips
Q: Do the mirrors and wood strips hold up over time?
A: After three years, I noticed some of the wooden strips attached with Liquid Nails had loosened. I reattached them using a hot glue gun, which might actually be a better option in the long run.
Q: How did you get the square 1×1″ pieces?
A: I simply ripped 1x2s in half using a table saw. It takes a bit of trial and error to get the blade set correctly. The cut isn’t perfect, but the imperfections are barely noticeable and well worth it for the cost savings.
Related Projects
Later on, we expanded the builder-grade closet underneath the stairs into a full mudroom with plenty of additional storage space: (Check out my post here).
The wooden grid-mirror perfectly compliments the wooden fireplace mantel. Check out my DIY stone veneer fireplace with wooden mantel here.
Shop the Look
Shop the look on Amazon.